Introduction: Why eSIM Pre-Activation Changes Everything
Table of contents
- Introduction: Why eSIM Pre-Activation Changes Everything
- Part 1: Understanding eSIM Installation vs. Activation
- Part 2: The Step-by-Step Guide to Activating eSIM Before Travel
- Part 3: How eSIM Activation Works When You Arrive
- Part 4: Why Pre-Activating Your eSIM is a Safety Essential
- Part 5: Real-World Scenarios: Why Pre-Activated eSIM Saves the Day
- Part 6: Graham Miranda eSIM Products for Every Travel Scenario
- Part 7: Step-by-Step: Your Pre-Activation Timeline
- Part 8: Common Questions About Pre-Activating eSIM Before Travel
- Part 9: Comparison: eSIM vs. Physical SIM Cards vs. Roaming
- Part 10: Beyond Connectivity: Why eSIM is Your Travel Advantage
- Part 11: Making Your eSIM Pre-Activation a Travel Habit
- Part 12: The Psychology of Prepared Travel
- Conclusion: Start Your Next Trip Right
- About Graham Miranda eSIM Services
When you're preparing for international travel, your mental checklist probably includes your passport, booking confirmations, and travel insurance. But there's one critical item that should be at the top of every traveler's list: activating your eSIM before you leave home.
Most travelers make the same mistake: they wait until they land to sort out their mobile connectivity. They're jet-lagged, exhausted, confused about local carriers, and desperate for internet. Meanwhile, eSIM technology has made this entire problem obsolete—if you know how to use it correctly.
Here's what you need to know: activating your eSIM in your home country before travel isn't just convenient—it's a game-changer for safety, peace of mind, and travel efficiency.
In this comprehensive guide, we'll walk through exactly how to activate your eSIM before travel, why the timing matters, how it keeps you safe, and why Graham Miranda eSIM Services is your best choice for international connectivity.
Part 1: Understanding eSIM Installation vs. Activation
The Critical Distinction That Most Travelers Miss
Before we talk about timing, you need to understand that installing an eSIM and activating an eSIM are two completely different things. This distinction is crucial because it determines whether you're ready to travel or if you'll arrive at your destination without data.
Installation: Installing is the process of downloading your eSIM profile to your phone. This is done via QR code or manual entry code and requires only a Wi-Fi connection. Installation does not consume any of your mobile data and is completely risk-free.
Activation: Activation is when your eSIM plan's validity period begins. This is when your data allowance starts counting down, and you can access mobile networks. Activation happens either automatically (when you arrive in your destination country) or manually (depending on your provider's policy).
Why this matters: You can install your eSIM weeks in advance without worry, because installation doesn't trigger your plan's validity. Your data won't start counting until your plan is actually activated.
What Happens When You Install vs. When You Activate
When you install your Graham Miranda eSIM:
- Your phone downloads the eSIM profile
- Your phone recognizes it as an available network option
- No data is used from your allowance
- Your validity period hasn't started yet
- You can test that the QR code works correctly
When your Graham Miranda eSIM activates:
- Your plan's validity period begins
- Your data allowance starts being available
- You're connected to local networks in your destination country
- Your purchased timeframe starts counting down
- Your phone shows full service bars
Part 2: The Step-by-Step Guide to Activating eSIM Before Travel
Step 1: Purchase Your eSIM (1-2 Weeks Before Travel)
Timing: Purchase your travel eSIM 7-14 days before departure. This gives you plenty of time to install, test, and troubleshoot if needed—without rushing.
Graham Miranda eSIM Options for Pre-Travel Activation:
- 3-Day Quick Trip eSIM: Perfect for weekend getaways (1-3GB data)
- 7-Day Explorer eSIM: Ideal for week-long trips (5-10GB data)
- 14-Day Adventure eSIM: Great for extended vacations (10-25GB data)
- 30-Day Nomad eSIM: Perfect for month-long travel (30-50GB data)
What you'll receive: After purchase, you'll receive an email with:
- QR code for easy installation
- Manual installation code (backup option)
- Activation instructions
- Customer support contact details
Step 2: Test Your Home WiFi Connection (3 Days Before Travel)
Before installation, ensure:
- You have a stable home WiFi connection (required for installation)
- Your smartphone is eSIM-compatible (most modern phones are)
- You have enough storage space on your phone
- Your phone has the latest iOS or Android update installed
How to check eSIM compatibility:
- iPhone: iPhone XS and later support eSIM
- Samsung: Most Samsung Galaxy S20 and newer support eSIM
- Google Pixel: Pixel 3 and later support eSIM
- Other Android: Check your manufacturer's specifications
Step 3: Install Your eSIM at Home (2-3 Days Before Travel)
Installation is simple and takes under 5 minutes:
- Connect to home WiFi
- Open your eSIM email from Graham Miranda with the QR code
- On your iPhone: Go to Settings → Cellular → Add Cellular Plan → Scan QR Code
On Android: Go to Settings → Network & Internet → Mobile Networks → Download SIM → Scan QR Code - Follow the on-screen prompts to complete the profile download
- You'll see confirmation that your eSIM profile has been installed
Important: Do NOT activate it yet. Just install it. Your plan validity won't start until your eSIM actually activates.
What you'll see after installation:
- Your eSIM appears in your Cellular Settings
- It shows as “Inactive” or “Ready to Activate”
- You can test switching between your home SIM and eSIM (though you won't have service yet)
- No data has been used from your allowance
Step 4: Test Your eSIM Installation (1-2 Days Before Travel)
Before you leave home, verify everything works:
- Switch to your eSIM in Cellular Settings (your phone will show no service initially, which is normal)
- Connect to WiFi to ensure your phone still works
- Download any offline maps you might need (Google Maps, offline city guides)
- Download offline translation apps (Google Translate, iTranslate)
- Switch back to your home SIM to ensure that still works
This test confirms that:
- Your phone recognizes your eSIM
- You can switch between SIMs
- Both your home SIM and travel eSIM work independently
Step 5: Set eSIM as Primary Before Departure (Day of Travel)
On the day you travel:
- Keep your home SIM active until you board your flight (so you can receive messages)
- Have your eSIM installed and ready in your phone settings
- In airplane mode: You'll have neither SIM active, which is correct for flight
- After landing: Switch to your eSIM by toggling it on in Cellular Settings
Critical tip: Keep a screenshot of your eSIM activation instructions with you. If you need to reinstall, you'll have the manual code as backup.
Part 3: How eSIM Activation Works When You Arrive
What Happens When Your Plane Lands
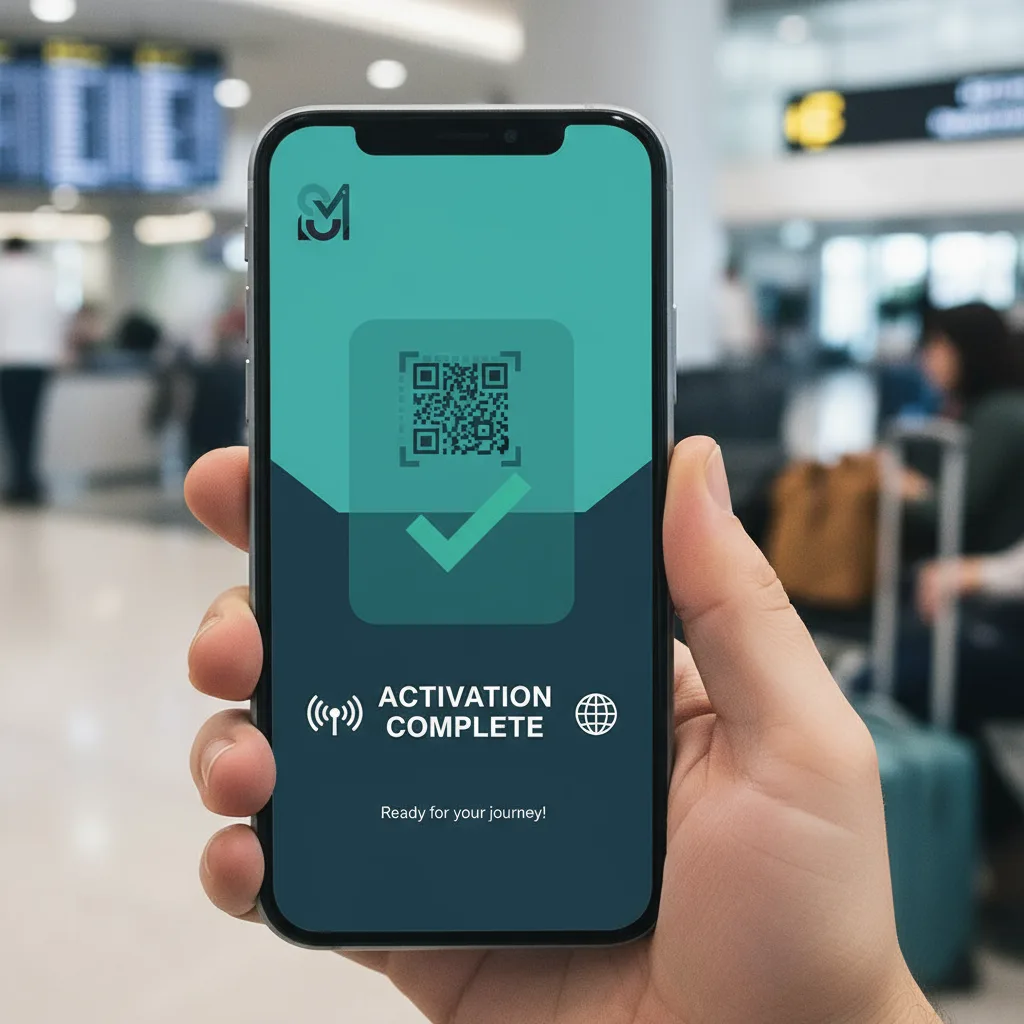
The magic of eSIM activation happens automatically when you arrive at your destination:
Within seconds of landing (once airplane mode is off):
- Your phone searches for available networks
- Your eSIM recognizes it's in a new country
- It connects to the local network partners that Graham Miranda works with
- Your service activates automatically
- You see full service bars and can use data immediately
No manual steps required. No visiting a local SIM shop. No language barriers. No getting scammed by unclear pricing. Your eSIM simply works.
Your eSIM Automatically Connects to Local Networks
Graham Miranda's eSIM network partnerships mean you automatically connect to the best available networks in your destination:
- Europe: Orange, Vodafone, local carriers
- Asia: Local operators with 4G/5G coverage
- Americas: Major carriers ensuring reliable connectivity
- Africa & Middle East: Partner networks with strong coverage
Your phone automatically selects the strongest signal from available networks, giving you the best possible connectivity throughout your trip.
Checking Your eSIM Status After Arrival
Once you land, verify your eSIM is working:
- Check Cellular Settings – Your eSIM should show network name and full bars
- Open a web browser – Test that data is working
- Send a message – Confirm basic connectivity
- Check data usage – You should see your plan's remaining data
If anything isn't working, contact Graham Miranda's 24/7 customer support immediately for troubleshooting.
Part 4: Why Pre-Activating Your eSIM is a Safety Essential
eSIM as Your Emergency Lifeline
Most travelers don't think about safety when planning travel. Then something happens—a missed connection, a delayed flight, a health issue, getting lost—and suddenly being able to contact help becomes critical.
Here's why your pre-activated eSIM is as important as travel insurance:
Reason 1: Instant Access to Emergency Services
When you arrive at your destination with an activated eSIM, you have immediate access to local emergency numbers:
- Europe: 112 (works from any network, including eSIM)
- USA/Canada: 911
- Australia: 000
- Japan: 119 or 110
Without active mobile connectivity, you'd be dependent on WiFi or asking strangers for help during an actual emergency. Your activated eSIM ensures you can always reach help.
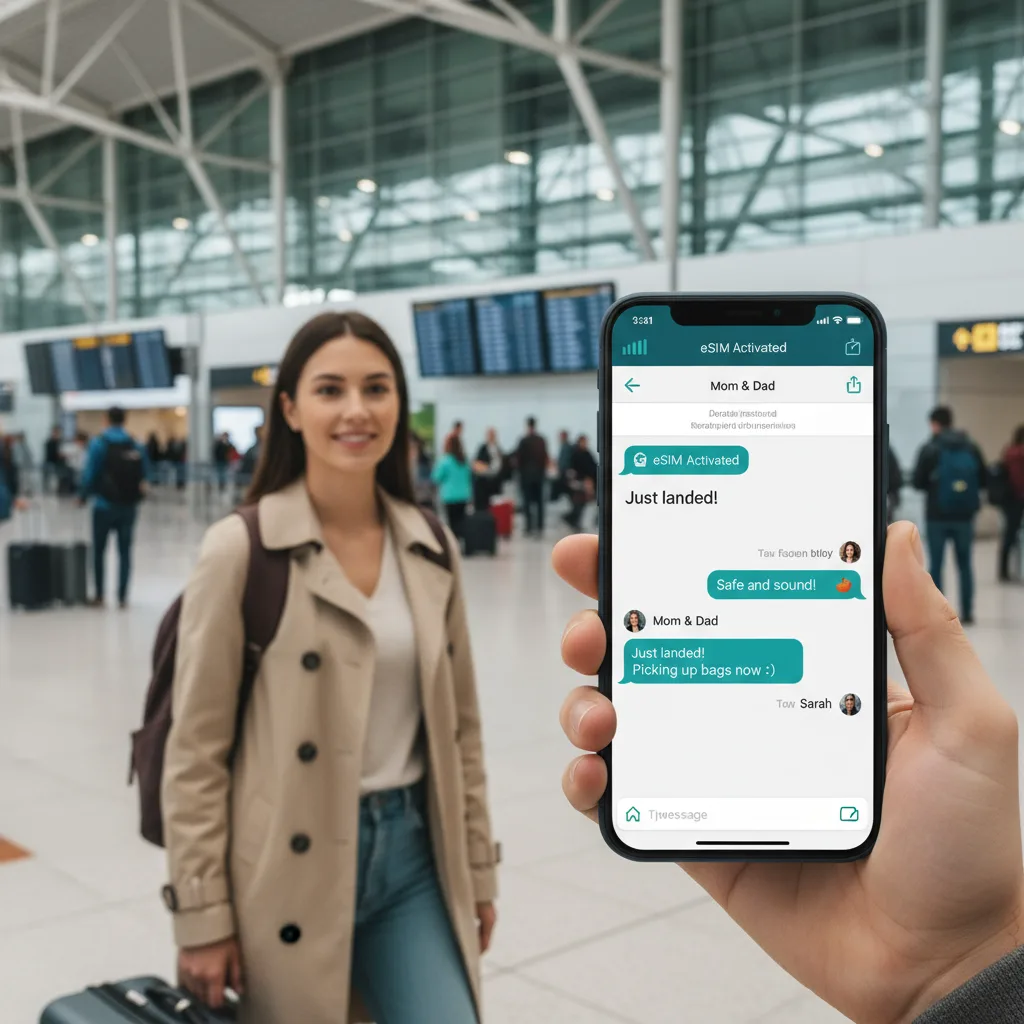
Reason 2: Updating Loved Ones About Your Safe Arrival
When you land and your eSIM activates, one of the first things you should do is contact someone at home and let them know you've arrived safely.
This matters more than you think:
- Your family knows you landed without incident
- You can share your location if needed
- You establish a communication channel for the trip
- You prove the travel eSIM is working
Most travel-related anxiety happens in those first hours after landing. Sending a simple “I've arrived safely” message to a trusted contact is priceless.
Reason 3: 24/7 Connectivity Throughout Your Trip
Once your eSIM activates, you have connectivity for:
- Navigation: Google Maps doesn't work without data
- Translation: Communicating with locals
- Emergency contacts: Calling home if something goes wrong
- Banking: Accessing money if needed
- Travel updates: Flight changes, weather alerts, safety information
- Ride services: Booking taxis, Uber, or local transport
- Accommodation: Contacting your hotel with questions or issues
Travel emergencies aren't always life-threatening medical situations. They're missed connections, lost luggage, flight delays, and unexpected situations. Your activated eSIM helps you navigate all of these.
Reason 4: No Desperate Scrambling at Airport Arrival
Imagine this scenario: You've just landed after 12+ hours of travel. You're tired, jet-lagged, and disoriented. Your flight was delayed. You need to find your luggage, get to your accommodation, and figure out your transportation.
Without an activated eSIM: You're frantically looking for SIM card vendors in the airport, dealing with language barriers, potentially getting overcharged, waiting for activation, and all while exhausted and vulnerable.
With an activated eSIM: You land, turn off airplane mode, and you have data. Done. Now you can focus on actually starting your trip.
Reason 5: Travel Insurance Compliance
Many travel insurance policies require that you maintain emergency contact capability while traveling. Having an activated eSIM ensures you can be reached in case of an emergency situation, and you can reach your insurance provider if needed.
Part 5: Real-World Scenarios: Why Pre-Activated eSIM Saves the Day
Scenario 1: Flight Connection Problem
You're in Paris with a connecting flight to Barcelona in 3 hours. Your Paris flight lands 2 hours late. You're now at risk of missing your connection.
With activated eSIM: You immediately check your Barcelona flight status via your airline app (data works), get a notification that it's delayed 1 hour, relax, grab coffee, and make your connection comfortably.
Without activated eSIM: You're stressed, searching for airport WiFi, unable to confirm flight status, potentially missing critical updates. You might show up at the gate too late.
Scenario 2: Lost in Translation
You're in Bangkok and your taxi driver doesn't speak English. You need to communicate your hotel address clearly.
With activated eSIM: You open Google Translate, show the driver your hotel's Thai name and address on your phone. No confusion.
Without activated eSIM: You try to communicate verbally, get lost, argue about pricing, and lose trust in your driver.
Scenario 3: Medical Situation
You're in Portugal and suddenly don't feel well. You need to explain your symptoms to a pharmacist or doctor.
With activated eSIM: You use translation apps, access your medical history via cloud, send your information to your travel insurance provider for pre-authorization, and get help efficiently.
Without activated eSIM: You're struggling to communicate, can't access medical information, and can't reach your insurance provider immediately.
Scenario 4: Family Emergency Back Home
Your family needs to reach you urgently about a crisis back home.
With activated eSIM: You receive a call or WhatsApp message immediately. You can respond within minutes.
Without activated eSIM: You might not hear about the emergency for hours or days, only discovering it when you access WiFi at an internet café or your hotel.
Scenario 5: Travel Plans Change
You've had an amazing time in Barcelona and you want to extend your trip. You need to book a last-minute flight to Paris.
With activated eSIM: You instantly search flights, compare prices, book, and get confirmation with all details on your phone—all while sitting in a café.
Without activated eSIM: You're looking for an internet café, potentially booking on sketchy public WiFi, vulnerable to security risks.
Part 6: Graham Miranda eSIM Products for Every Travel Scenario
Understanding Your eSIM Options
Graham Miranda offers multiple eSIM products designed for different types of travelers. Here's how to choose:
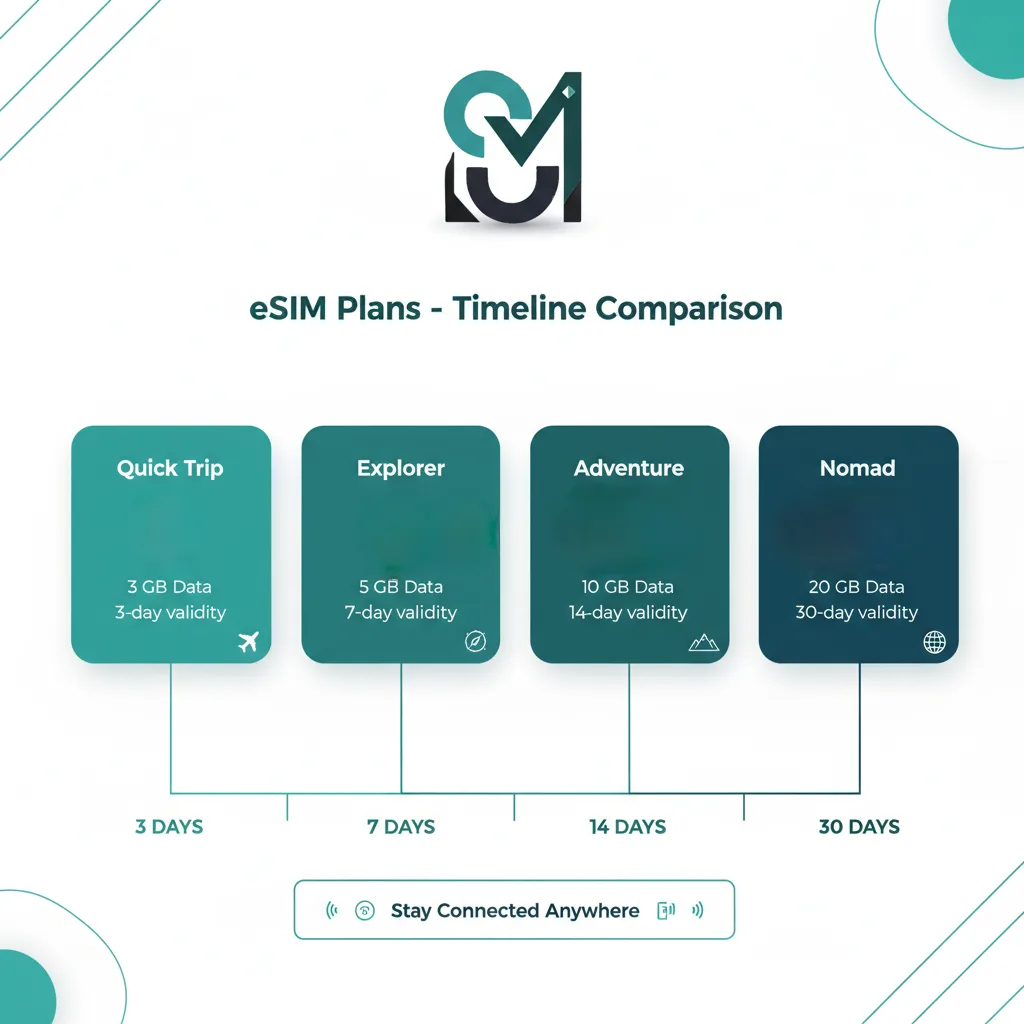
Product 1: Quick Trip eSIM (3-Day Plans)
Best for: Weekend getaways, short business trips, last-minute travel
Available in:
- 1GB (€12)
- 3GB (€18)
Who should choose this:
- City break travelers
- Business trip to one location
- Testing eSIM before longer trips
Coverage: 190+ countries, instant activation upon arrival
Product 2: Explorer eSIM (7-Day Plans)
Best for: Week-long vacations, first-time travelers to a region
Available in:
- 5GB (€25)
- 10GB (€35)
Who should choose this:
- Standard vacation travelers
- Moderate social media users
- Travelers with WiFi access at accommodations
Coverage: 190+ countries, works across multiple borders
Pro tip: This is our most popular option. It balances data, cost, and coverage perfectly.
Product 3: Adventure eSIM (14-Day Plans)
Best for: Two-week trips, regional exploration, moderate heavy users
Available in:
- 10GB (€40)
- 20GB (€60)
Who should choose this:
- Road trippers across multiple countries
- Content creators (photos, videos)
- Frequent video call users
Coverage: 190+ countries, designed for multi-country travel
Product 4: Nomad eSIM (30-Day Plans)
Best for: Month-long travel, digital nomads, expat stays
Available in:
- 30GB (€80)
- 50GB (€120)
Who should choose this:
- Digital nomads and remote workers
- Long-term travelers
- Heavy data users (streaming, video calls, working online)
Coverage: 190+ countries, includes business-grade reliability
Professional support: 24/7 customer support included
Product 5: Multi-Country Regional eSIM
Best for: Travelers crossing multiple borders, European tours
Available in:
- Europe 7-Day: €30 (5GB)
- Europe 14-Day: €50 (10GB)
- Southeast Asia 14-Day: €45 (15GB)
- Americas 14-Day: €55 (10GB)
Why choose regional eSIMs:
- No switching SIMs between countries
- Unified data allowance across region
- Consistent pricing
- Seamless cross-border connectivity
Part 7: Step-by-Step: Your Pre-Activation Timeline
14 Days Before Travel
- [ ] Determine which Graham Miranda eSIM product fits your trip
- [ ] Purchase your eSIM online
- [ ] Receive confirmation email with QR code
- [ ] Verify your phone is eSIM-compatible
7 Days Before Travel
- [ ] Download any offline apps you might need
- [ ] Test your home WiFi connection
- [ ] Take screenshots of your eSIM instructions
2 Days Before Travel
- [ ] Install your eSIM at home (via QR code)
- [ ] Verify it appears in your Cellular Settings
- [ ] Download offline maps for your destination
- [ ] Download offline translation apps
1 Day Before Travel
- [ ] Test switching between your home SIM and eSIM
- [ ] Verify both work independently
- [ ] Charge your phone fully
- [ ] Pack all necessary chargers and power banks
Day of Travel
- [ ] Keep home SIM active until boarding
- [ ] Enable Airplane Mode before takeoff
- [ ] Save Graham Miranda support number in your contacts
- [ ] Have eSIM instructions screenshot saved
Upon Landing (After Airplane Mode Off)
- [ ] Allow 30-60 seconds for eSIM to activate automatically
- [ ] Check Cellular Settings for active network
- [ ] Send a message to confirm connectivity
- [ ] Contact someone at home to confirm you've arrived safely
During Your Trip
- [ ] Monitor data usage in Settings
- [ ] Keep backup eSIM instructions accessible
- [ ] Contact Graham Miranda support if any issues arise (available 24/7)
Part 8: Common Questions About Pre-Activating eSIM Before Travel
Q1: Will My Plan Start Using Data Before I Travel?
Answer: No. Graham Miranda eSIMs only begin using your data allowance when the eSIM activates in your destination country. Simply having it installed doesn't consume data.
However, this varies by provider. Always check your specific eSIM's activation policy:
- Activation at destination: Safe to install early
- Activation immediately upon install: Install only 24 hours before travel
Graham Miranda uses destination-based activation, so you can safely install weeks in advance.
Q2: What if My eSIM Doesn't Activate When I Land?
Answer: This is rare but can happen. Here's what to do:
- Ensure Airplane Mode is OFF
- Toggle airplane mode ON, then OFF to reset network connection
- Manually toggle your eSIM off and on in Cellular Settings
- Wait 2-3 minutes for automatic connection
- Check if you're in network coverage area (sometimes airports have dead zones)
- Contact Graham Miranda 24/7 support – they'll help remotely
99.9% of eSIM activation issues resolve within 5 minutes of troubleshooting.
Q3: Can I Use My Home SIM and eSIM at the Same Time?
Answer: Yes! This is called dual SIM and is one of eSIM's biggest advantages.
How it works:
- Your home SIM maintains your regular number and service
- Your eSIM provides data in your destination country
- Calls to your home number go to your home SIM
- WhatsApp, Telegram, and data apps use your eSIM
Why this matters:
- You stay reachable on your home number
- You pay only for data on your travel eSIM
- Perfect for business travelers and frequent communicators
Most modern iPhones and Android phones support dual SIM. Check your phone's settings to enable it.
Q4: What If My Flight Is Delayed and I Activate Too Early?
Answer: This isn't a problem with Graham Miranda because:
- Your eSIM only activates when it detects your destination country's network
- If your flight is delayed and you fly another day, your eSIM simply waits
- Your plan's validity only begins when you're actually in-country
- No data is wasted on delays
This is why we recommend installing your eSIM early but letting automatic activation handle the timing.
Q5: Can I Install My eSIM While Traveling?
Answer: Yes, but it's not recommended. To install an eSIM, you need:
- A stable WiFi connection
- Your phone and installation code or QR code
- At least 10-15 minutes of uninterrupted setup time
If you forget to install before travel, you can do it:
- At your hotel on arrival (wait until you have WiFi)
- At a coffee shop with strong WiFi
- At the airport WiFi (though this is often unreliable)
This is why pre-installation at home is so much better—you eliminate stress and ensure everything works.
Part 9: Comparison: eSIM vs. Physical SIM Cards vs. Roaming
Why Pre-Activated eSIM Beats All Alternatives
Let's compare your connectivity options for international travel:
| Factor | Pre-Activated eSIM | Physical SIM Card | Home Roaming |
|---|---|---|---|
| Setup Time | 5 minutes (home) | 30-60 minutes (airport) | N/A |
| Cost | €1-100 (Graham Miranda) | $15-200 (varies) | $50-150+ |
| Data Speed | 4G/5G | 4G/5G | Often limited |
| Activation Time | Automatic on arrival | Manual at shop | Automatic |
| Language Barrier | None (QR code) | Significant | N/A |
| Risk of Loss | None (digital) | Physical card lost | N/A |
| Multiple Countries | Seamless switching | Need new card each country | Global roaming |
| Setup Location | Home (safe, WiFi) | Foreign airport (stressful) | N/A |
| 24/7 Support | Graham Miranda online | Local provider (closed hours) | Home provider |
| Emergency Ready | Yes (data on arrival) | No (need setup first) | Limited (expensive) |
Clear winner: Pre-activated eSIM from Graham Miranda.
Part 10: Beyond Connectivity: Why eSIM is Your Travel Advantage
The Ripple Effect of Having Your eSIM Pre-Activated
When you arrive at your destination with an activated eSIM, the benefits extend far beyond just having internet:
You Project Confidence
Travelers with data appear confident. They're checking maps, speaking to locals via translation apps, and making decisions independently. Travelers without data appear lost and vulnerable, making them targets for scams or overpayment.
You Make Better Decisions
With instant access to information, you can:
- Compare restaurant prices and reviews before eating
- Check weather before planning activities
- Verify authenticity of tours or services
- Research neighborhoods before going there
You Stay Safe
As mentioned earlier, you can reach help instantly and stay in contact with people who know your itinerary.
You Travel Faster
You don't waste 1-2 hours of your first day sorting out connectivity. You land, activate your eSIM, and start experiencing your destination.
You Save Money
Most Graham Miranda eSIM plans cost €12-120 for 1-50GB of data. Compare this to:
- Physical SIM cards: $15-50 per country (if traveling multi-country)
- International roaming: $50-150+ (absolutely overpriced)
- Airport vendor pricing: 2-3x marked-up rates
With Graham Miranda, you know exactly what you'll pay before you leave.
Part 11: Making Your eSIM Pre-Activation a Travel Habit
A Travel Checklist That Actually Makes Sense
From now on, your travel preparation should include:
One Month Before:
- [ ] Decide destination(s)
- [ ] Check eSIM compatibility of your phone
Two Weeks Before:
- [ ] Purchase Graham Miranda eSIM for your trip duration
- [ ] Download offline maps and translation apps
One Week Before:
- [ ] Install your eSIM at home
- [ ] Test both SIM switching
Day Before:
- [ ] Final charge and test
- [ ] Download any additional offline content
Day of Travel:
- [ ] Pack with confidence knowing connectivity is sorted
This simple pre-activation routine transforms your entire travel experience.
Part 12: The Psychology of Prepared Travel
Why Knowing You're Connected Changes Everything
Travel anxiety has several sources:
- Safety concerns: Addressed by being reachable
- Navigation concerns: Solved by map data
- Communication concerns: Handled by internet connectivity
- Decision-making concerns: Eliminated by instant information access
When you pre-activate your eSIM before travel, you're psychologically preparing yourself for a confident travel experience, not just setting up connectivity.
This is why experienced travelers swear by eSIMs. It's not just about data—it's about peace of mind.
Conclusion: Start Your Next Trip Right
The era of frantically searching for SIM cards at foreign airports is over. The days of waiting hours for connectivity to be sorted out are finished. The anxiety of being unreachable in a new country has a solution.
Pre-activating your eSIM before travel is the single best investment you can make in travel preparation.
Here's what happens when you use Graham Miranda:
- ✅ Purchase your eSIM 2 weeks before travel
- ✅ Install it 2-3 days before travel (5-minute process)
- ✅ Activate automatically when you land
- ✅ Experience your destination with confidence
- ✅ Stay safe and connected throughout
You'll wonder how you ever traveled without this setup.
Ready to travel smarter? Choose your Graham Miranda eSIM product today based on your trip duration. Install it at home. Arrive at your destination connected, confident, and ready to explore.
Your next adventure is waiting. Make sure you're connected for it.
About Graham Miranda eSIM Services
Graham Miranda specializes in professional eSIM services for travelers worldwide. Our eSIMs work in 190+ countries with 4G/5G connectivity, backed by comprehensive Markel Insurance coverage ensuring service reliability.
Why Graham Miranda:
- Pre-tested networks in every destination
- 24/7 customer support
- Flexible plans (3-day to 30-day)
- Professional insurance backing
- Simple QR code activation
- Competitive pricing
Start your connected journey today:
Visit eim.grahammiranda.com to choose your eSIM product and prepare for your next adventure.